Tutorial
Overview
The app has three tabs.
Annotate: contains functions for annotating LOINC codes (mapping LOINC codes to HPO terms);
Loinc2HpoAnnotations: displays the annotations created from the Annotate tab;
Loinc2HpoConversion: retrieves patient observations and convert to HPO terms.
Annotation
Before you start annotation, make sure that you have configured the app properly (see Configuration).
There are two modes of annotation, the basic mode and the advanced mode. For basic mode annotation, you simply pick 3 (or less) that correspond to the LOINC code when the observation value is abnormally low, normal, or abnormally high, and the app will map them to the correct codes; for advanced mode annotation, you have to specify the code and the corresponding HPO term for each LOINC code.
Quick Start
Follow the steps to start the curation process.
- Import LOINC codes. If you have configured the app properly, you should be able to see there are contents in the LOINC table. You can always click “Initialize Loinc Table” on the left upper corner to import Loinc codes from the Loinc Core Table file. Try using the “Search” function to select some Loinc codes, e.g. try searching for “10449-7” and then “glucose” (You will get one result for “10449-7” and many results for “glucose”).
- Import HPO. Click “Initialize HPO appTempData” on the left upper corner to import all HPO terms to the app. If you configured the app properly, this will automatically run when you start the app.
- After completing the above steps, you should be able to start annotating LOINC codes!
- Go to the Loinc Table in the bottom half of the tab, and choose the LOINC code that you want to annotate. When you click the “Auto Query” button or double click on the LOINC code, the app will automatically find candidate HPO terms for you, listed from the most likely term to the least likely.
- Choose the appropriate term and drag it to one of the three textfields. (Tip: you can drag another term to overwrite the current one; try to avoid manually typing to avoid spelling error).
- After you are done with the current annotation, you can click “Create annotation” button to record your annotations. You are done with one LOINC code! Now if you go to the Loinc2HpoAnnotations tab, you will find the annotation in the table.
A few helpful features
Filter the Loinc table. You can choose a subset of LOINC code to annotate. To do this, create a .txt file with one Loinc code in each line (see the following example.) Save the file and click the Filter button. Point to the .txt file and you should get a much shorter list of Loinc codes in the table.:
15074-8
779-9
600-7
Alternatively, you can use the long common names of Loinc codes like below:
Potassium [Moles/volume] in Serum or Plasma
Hemoglobin [Mass/volume] in Blood
Erythrocyte distribution width [Ratio] by Automated count
You can switch to previously filtered lists by right-clicking the Loinc Table and choosing relevant buttons.
Flag an annotation. If you are not certain about your annotation and wants to come back later, you can check the Flag checkerbox as a reminder.
Leave a note for your annotation. You can leave a note on your annotation whenever necessary, e.g. why annotate this way, why it needs revisit, etc..
Find parent and child for an HPO term. When you double-click on a candidate HPO term, the app will find its parent(s) and child(ren) and display it in the right box. Sometimes this can be helpful in determining whether a HPO term should be chosen or not. (Tip: it can save time, too. e.g. If you double-click on “Abnormality of blood glucose concentration”, you will find “Hyperglycemia” and “Hypoglycemia” as its two children. Drag the children to fill the correct textfields, without needing to go through the long list of candidate terms looking for “Hyperglycemia” and “Hypoglycemia”!)
Manually search for candidate HPO terms. If Auto Query does not give you the HPO terms that you need, try using the Manual Query button with comma-separated keys. Tip: try synonyms; words without comma will be taken as one key and the app will try to find a exact match to it.
Group LOINC. Sometimes you may not be able to annotate a LOINC code because you are waiting for new HPO terms (see below:
Suggest new HPO terms) or you simply do not know how to annotate it. You can group LOINC into a list so that your collaborators can help. Right click on the LOINC code, choose Group/ungroup and select a list. By default there will be two groups, “require_new_HPO_terms” and “unable_to_annotate”. You can create more groups but the app does not display their colors very well yet (working on it!).
Review/Edit your annotations
You can review all your annotations (sort of…continue to Advanced Mode curation to see why) under the Loinc2HpoAnnotations tab. Right-click a LOINC annotation and choose “Review” to see all annotations. Focus on the left two tables for the current being and we will deal with right table later.
Alternatively, you can review annotations in the Annotate tab. Select the Loinc code that you want to review and then click the All annotations button.
In both cases, you can edit LOINC annotation by click the Edit button. You may go to Loinc2HpoAnnotations tab, right-click a Loinc code and choose “Edit” directly. The app will bring you back to the annotation mode so that you can overwrite your annotations with new values. After you are done, click “Save” to save your new data.
Advanced Mode curation
Consider this Loinc test: Loinc 600-7 or Bacteria identified in Blood by Culture. The name of the Loinc code suggests two types of outcomes:
- Whether there are bacteria identified in the blood or not (alternatively, we say whether the patient is “positive” or “negative” for bacterial infection). In this case, we choose “Recurrent bacterial infections” for positive and the same term in negated form for negative result and annotate in the Basic Mode as described above.
2. What type of bacteria is identified in the patient’s blood. Here is from a real-world example.
"coding":[
{
  "system": "http://snomed.info/sct",
  "code": "3092008",
  "display": "Staphylococcus aureus"
}
]
We can guess that the above lines indicate that the patient has S. aureus infection in his/her blood. In this case, our Basic Mode does not work well anymore because it only handles values that are too high, too low and intermediate. This is when Advanced Mode comes into play. To allow our app recognize this result, we need to assign a HPO term for Snomed code 3092008. To do this,
Select Loinc 600-7 by using the “Search” function.
Annotate Loinc 600-7 at the Basic Mode as described in last section. You may also skip this step to next one.
Annotate at Advanced Mode. Click “advanced>>>” button and you will see three new textfields for system,`code`, and hpo term.
Type in “http://snomed.info/sct” into system, “3092008” into code. (Note: the information in system and code is sufficient to encode a piece of information, display is only used for display purposes so we do not need it)
Now we have to choose a HPO term. As an example, we double-click on “Recurrent bacterial infections” and drag one of its children “Recurrent staphylococcal infections” to the hpo term field. Click the + button to add this annotation.
Repeat the above two steps if you have more codes to add. After we are done, click Create annotation button to complete.
Now if you review your annotations for 600-7, you can see annotation data in the left bottom table. (This is why we said the table in Loinc2HpoAnnotations does not show all the annotations information–because it does not show data that were created for Advanced Mode curation)
Note: Pay attention to the strict proprietary right of Snomed codes. It may not be allowed to map to other codes.
Term negation Term negation means that you cannot find a HPO term that matches your need, but the opposite of a HPO term does. For example, if a patient’s blood glucose concentration is normal, we say that the inverse of “Abnormality of blood glucose concentration” best describes his/her phenotype.
Note: In the Basic Mode, the “negate” button only controls the term in the center textfield. The default value is true for Basic Mode, false for the Advanced Mode.
Suggest new HPO terms
Sometimes you may not be able to find an appropriate HPO term for a LOINC code. You can send a request to the authors of HPO directly from the app to ask for new terms.
- Create a new term for a Loinc code. Select a Loinc code and then click “Suggest New HPO term”. Provide the proposed term and your comment, type in your GitHub username and GitHub password, choose a label that best describes your request, e.g. LOINC, and click “Create GitHub issue”.
- Create a new child term for a Loinc code. If a current HPO term is close to what you need but you need a new child beneath it, you can select both the Loinc code and the candidate HPO term, right-click, select “Suggest child term”, fill in relevant information and submit.
Note:
- If you do not have a GitHub account, you need to create one following their instructions ([GitHub website](https://github.com)).
- The app currently does not support authentication with two-factor verifications [learn more](https://github.com/blog/1614-two-factor-authentication). If you enabled that feature on your account, you may encounter issues during submission.
Save & Export data
To save data, you can click File - Save Session. This will save your annotations into loinc2hpoAnnotation/Data/TSVSingle/annotations.csv. All those files are located at the folder that you specified for auto-saved data.
Converting Observations to HPO terms
The third tab “Loinc2HpoConversion” is responsible for converting patient observations into corresponding HPO terms using the annotation map generated above. Here we will demonstrate a few different ways to do this, which is largely dependent on the source of patient observations.
Convert locally stored observations to HPO terms
Assuming that you have some json serialization of patient observations, you can click Local to select the files (multi selection is supported). The app will import the files into the left text region. Then you can click the convert button to get the HPO term.
Download observations from FHIR server and convert to HPO terms
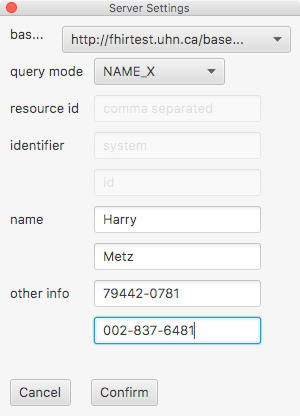
In real world, patient information and their observations are probably saved in a hospital FHIR server. In order to get the observations for a patient, you have to retrieve the patient first using his or her identification. To do this, click the Server button, type in the base url for the FHIR server, and provide relevant information to search for the patient.
To demonstrate the process, we will search for a patient named “Harry Metz” with a phone number “002-837-6481” and postal code “79442-0781” from a test FHIR server (hapi-fhir test server: http://fhirtest.uhn.ca):
After clicking confirm, the patient is found on the server and loaded into the left text region.
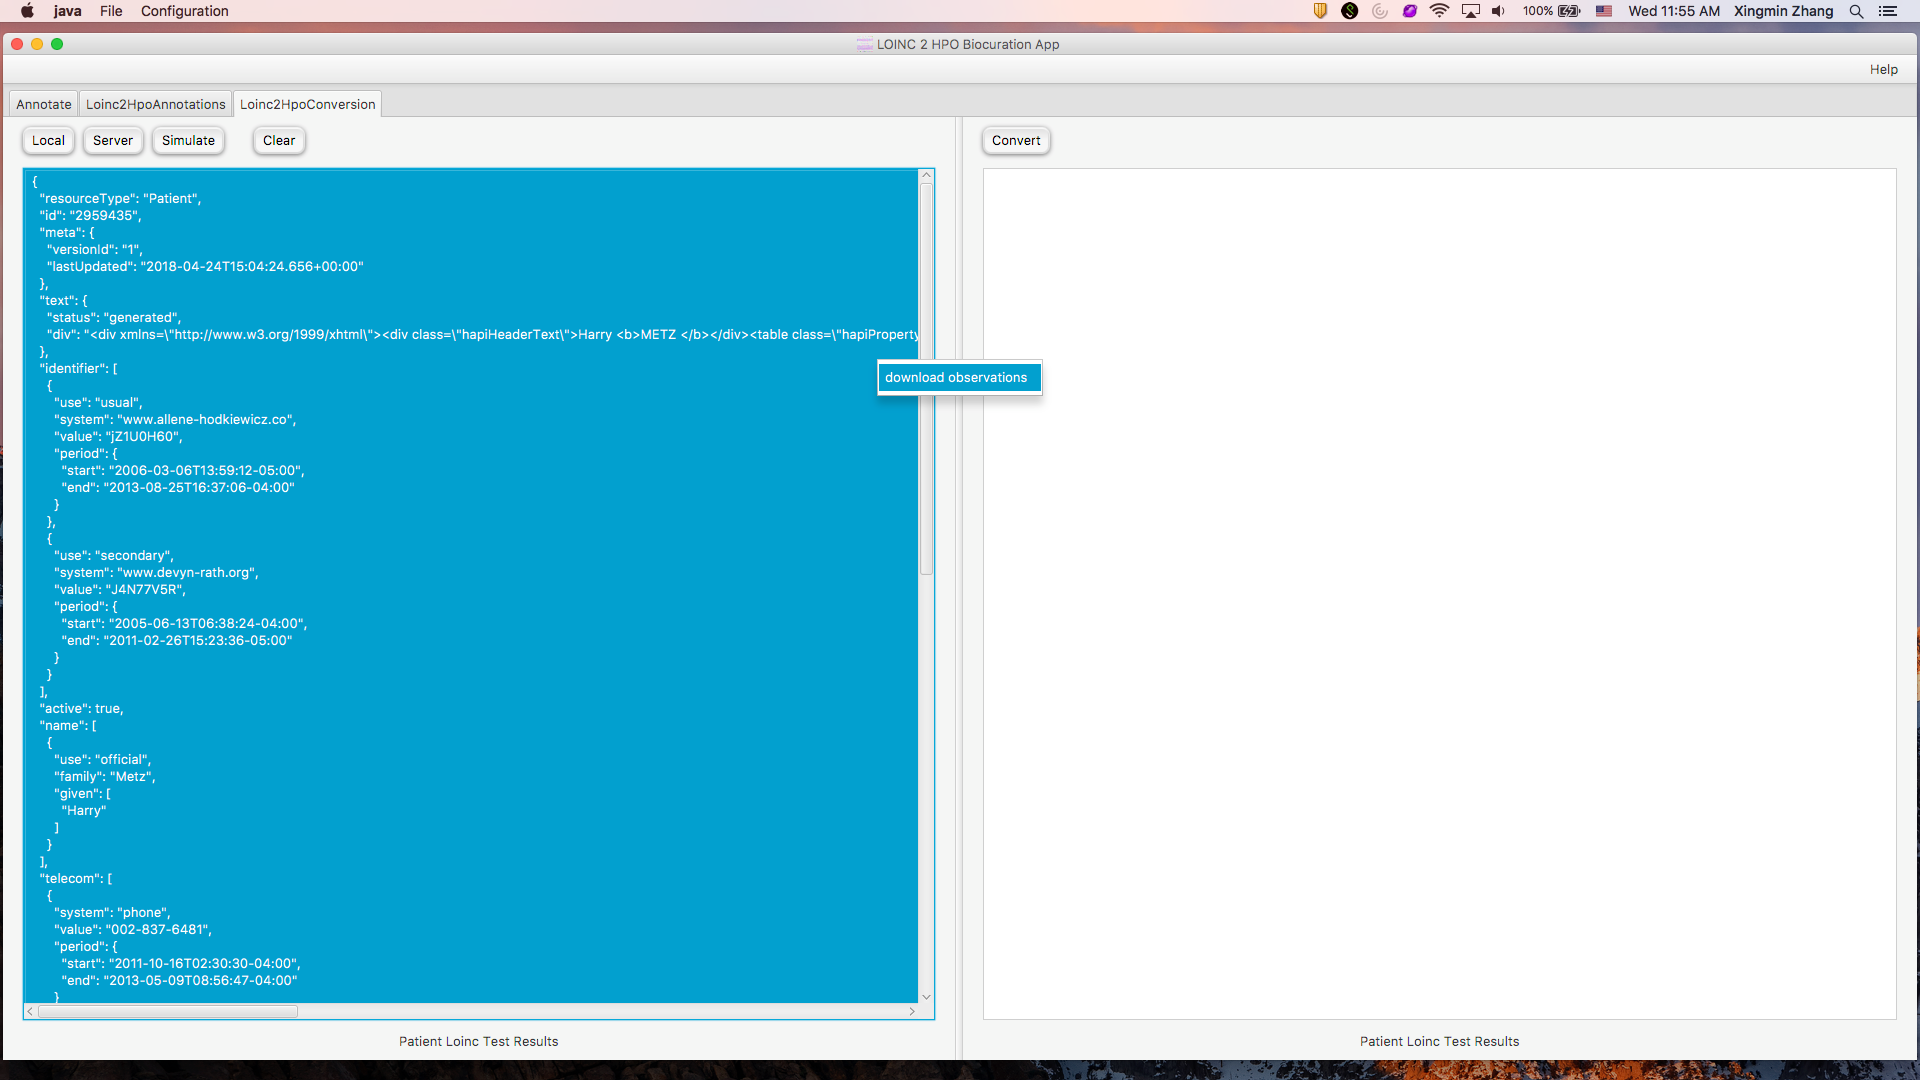
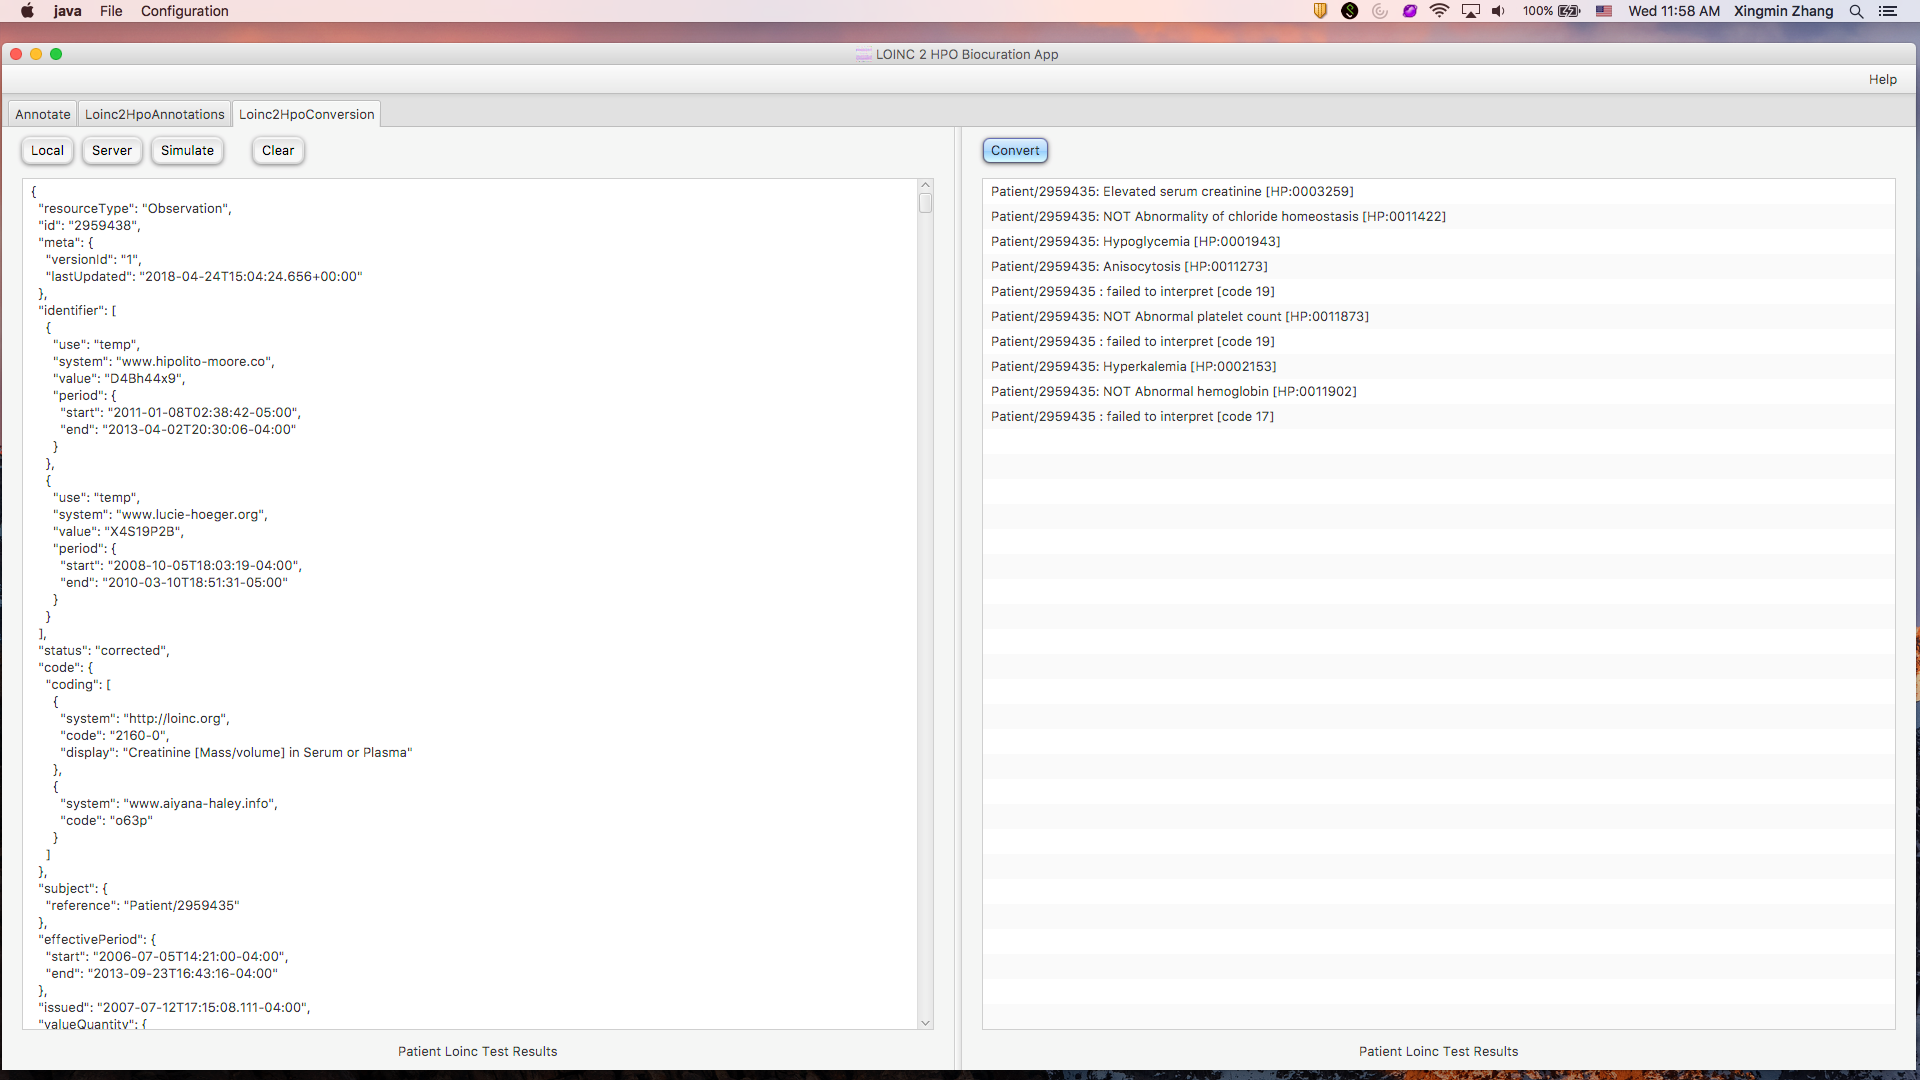
Next, you can get all observations related to this patient by right clicking on the patient record and then clicking “download observations”. The observations will be loaded to the left text region. Last, you can click Convert button to get a list of HPO terms, one for each observation, on the right text region.
Note that you may not be able to find such a patient if you try it yourself. This is because the hapi-fhir test server regularly purges their system so all data will be lost. We actually faked such a patient and uploaded to the test server right before we wrote the tutorial. Next, we are going to show you how we did this.
Simulate patients and observations
For demonstration purposes, you can create simulated patients and their observations by clicking the Simulate button. You will see a popup window that asks you how many patients you want to simulate. Currently, we choose to create 10 observation for each patient, 5 Qn type, 4 Ord type (“presence”/”absence” outcome) and 1 Nom type. Check the “Upload” checkerbox and click Confirm. The app will generate fake patients and observations and then upload to the hapi-fhir test server. If it is successful, the patient information will populate the left text region. You can select a patient and request his/her observations from the server. Since the server has the patient, you are now able to search for it using his/her identifications.

Note that the hapi-fhir server is not always stable. You can avoid uploading to server by not checking the Upload choice. If you do that, patient observations will directly populate the left text region.